Wednesday 6 May 2015

The Warmongering Statue - Texturing

It was time to create the low-poly model of the statue and add some textures.

I took my highpoly model, and retopologised it and created a low poly model, then unwrapped it.


I had to play around with the zRemesh tool as I was getting a few spirals when I was remeshing the model, but I managed to fix it in the end with a bit of experimentation.

I followed the usual process and created my textures in dDo:


The albedo map was pretty simple for this one, as most of the detail was going to come from the normal and AO maps.


I still want to work on the textures a bit until the degree show. The normals came out well but I feel I can do better with the actual mateial on the model.

I also aim to a few versions of the model, one in a pose. But this will be for the final polish for the show.

I'm happy with how quickly this model came together, and would like to work a bit more on it to get that extra polish.

The Warmongering Statue - Sculpting

As we were coming up to deadlines, I wanted to add one more model to the game. Which is the Warmongering Statue - one of the interactable objects that the player can trigger memories off.

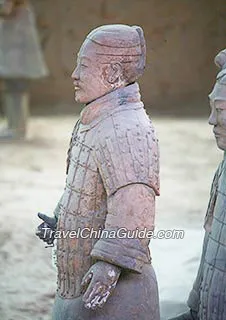
I was inspired by the armour and design of the terracotta soldiers:


I wanted this to be a quick model as we had deadlines approaching.

I decided to model it in zBrush. I begun with a basemesh, then used the extract mesh tool to mask and pull out geometry.


After extracting a new subtool, I used the move tool and zRemesh tool to stretch it out and make it into the underskirt of the statue.

I should note here I made the mistake of ticking the 'double' sided option when extracting the models, which resulted in some really terrible extractions, and was a pain to retopologise. Thankfully I managed to fix it, but in future I know not to check that option.


I extracted again to create the trousers and scarf for the character.

I started following the terracotta soldiers' armour design here - with the breast plate over the skirt and a scarf around the neck.


I then extracted a mesh for the shoulders - though they looked rather soft and not very hard edged.


I started adding detail at this point, using the damStandard brush to add the criss-cross pattern to the armour.


The next step was to use an alpha to add the bolts to each part of the pattern.


This was quite fiddly as I had to do it all by hand, but it paid off well I thought - and was more accurate overall. I doubt there would be an automated process for this.

I was getting sick of trying to model the shoulder pads in zBresh, so I made a mesh in 3ds max.


I used some standard primitives to create the shoulderpads, but I think they came out quite well overall.

I then started adding further detail to the statue's 'clothing'.


I began introducing the polish brushes here to try and create a more hard edged and rock like feel to the mesh. I started by trimming the corners to square off the model.

As with the shoulder pads, I got sick of trying to model the boots in zBrush, so I did a low poly in 3ds max and sent it over.


I added some further detail to the hair and face.


I did not add too much to face, just tried to keep it squarer and beveled.

Next part was the fun part. I used alphas and brushes to add cracks and dent to the model. I used the polish brush to further harden the edges of the model to make it more statue like!


Considering this was a really quick model, I'm pleased with the results.

I'm discovering more tools with zBrush and I'm really enjoying how they are improving my workflow. I think if I had more time I would like to work more on his face - make it more oriental to match the terracotta theme. But I'm happy with the detail I've achieved in a short time.

The Main Character - Retexturing and Finalising

When it came to finishing the Main character's model and textures, I made a few additions to the hair first:


It wasn't much but I moved around and added some more planes, to further bulk up the hair, and make it less blocky/dreadlock-like. The intention was to add more layers with the alpha maps, namely through the strands flicking off his head.

When it came to texturing the character I wanted to push for more color variation:


That being said, I didn't want to overwhelm the player with too many characters on the outfit. Instead I choose three primary colors for the fabrics and a brass material for metal. I felt his worked well as it helped to create some nice variation in the character's outfit - the cloth and leather complimenting each other.

For my renders I used the control rig Nik made to pose my character:


I then sent the model over to Marmoset.


I'm pleased with the results I got for our player character, even if did change a fair amount from the original concept.

The two biggest hurdles was definitely learning to juggle both learning zBrush and anatomy. This is really my first human character and I feel that I've done a decent job on him. He's definitely not perfect - his face is still a little off to me and the skin textures can still use more work. But for a first attempt I've learnt a lot and I am looking forward to applying that knowledge to a new project.

As an additional note I wish I also picked a different hairstyle, as the one I went for was very hard to create and make convincing. But I gave it my best attempt.

The Bird Boss - Texturing and Finalising

My goal with the bird was to update his textures to support PBL.

I didn't add much extra to the actual model, other than some additional feathers:


After exporting the new maps from the updated zBrush sculpt, I created and messed around with the materials to get the effect I was after:


I used the hair material for the feathers, and two diffrent flesh materials for the rest of the body.

I took some inspiration from From Software's Bloodbourne when it came to the texture of the bird:


Namely I wanted him to be darker, wetter and overall more gross and intimidating to the player.

Therefore I upped the gloss values of the model slightly.

Like I did with the Wurm, I took a pose from one of Nik's animations:


Then when all was in place, I created some renders in Marmoset:


I'm really glad I updated the textures. I feel the new materials look really great and bring out more detail in the bird as well.

In the future I think I would like perhaps use less planes on the bird's mesh, have them be bigger and longer to add more overall shape.

I also think I should of made the actual mesh higher poly, to better capture the sculpted detail.

Still I'm pleased with the results, and the model proved to be a good learning experience for me.

Narrative and Dialogue

To add some narrative to our game, we decided to focus on some story telling elements with our game.

We've already established that the player is a treasure hunter, seeking an Amilarry Sphere. But why is he in this strange world?

We decided to add a voice-acted monologue to the character, where he would make comments on the world around him.

This would act as both a narrative element - such as explaining why he's there, and what he's after. And also some of his monologue would act as guidance and tutorials to the player - such as commenting on being able to use his grapple on a certain object.

As part of this process I wrote a script for the character's Monologue - which incorporated some narrative ideas:


We wanted our storytelling to be somewhat subtle - rather than a play by play. But I made sure to have the dialogue reflect the character's thoughts so that he can provide context to why he is there.

In addition to this, we wanted to flesh out the lore of the world.

We had the idea of certain objects in the world, that could be triggered to play a memory (voice over) of their previous owner. This creates a sense of a more living world, and that adds some mystery to the it:


We had three sessions in the sound room.

The first session we got used to using the equipment and recorded the Hero's initial monologues. We had a few of us try to try and decide who would be best for the role.

The second time we repeated this process, giving people more preparation time.

In our third and final session, we had a variety of different actors from other courses to voice the four memory characters.

We hope to include these Monologues for the degree show build, and have them trigger appropriately.

The Gorge Bridge - Creating Platforms

A quick update to the Gorge Bridge.

One of the ideas we had was for the giant Wurm in our scene to smash the Gorge-Bridge, with the resulting rubble creating floating platforms.

To achieve this I simply broke up the bridge I already had:


I mainly deleted polygons, then used the cap or collapse tools to cap off the ends.

When it came to mapping the broken ends, I simply uv mapped them to use the same texture as the gorge bridge's cap:


I also used a script named vorosfrag to decimate and destroy one of the platforms so that they can be turned into rubble:


This was just a quick way to create some platforms to use in our game, but I feel it worked quite well.


If I have more time I would very much like to experiment more with the shatter script, I feel it can create an interesting atmosphere with the floating rubble and can add to the surrealness of our scene.

Ruins - Modelling and Texturing

To add some additional models to the scene, I created some modular ruins that could be placed around the scene.

I started by focusing on some archways, inspired by this concept:


I began by constricting and extruding an archway, using the standard 3ds max tools.


I focused on where I wanted the break in the archways to be, building the breakage around the top of the collumn.


I used the extrude tools to add some detail and volume to the breakage on the archway.


I also used the inset tool, to create a border around the collumn - and make it look the archway is constructed of stacked blocks.

Once in zBrush, I sculpted the rubble on top of the archway.


I started off with a hard surface build up brush, before masking the area off to add some surface noise deformation and erosion.

I then turned my attention to the columns themselves.


I added some light stone textures, before using another buildup brush to bring out the border of the stone bricks.

For the insignia I used an alpha to extrude the shape.

Once happy with the model, I exported it and then returned to my scene.

Since this was going to be a modular ruins, I began to split up the columns and archway.

I split up the top rubble, and square block so that they could be placed around the scene at will. The intention was to stack the blocks up to make our own columns

For other ruin pieces I looked at a reference of some greek modular ruins:


I decided to try and replicate these models, as I felt they could be really useful to spread around the scene to create unique ruins, using a few pieces.

For each model I made a simple shape then took it into zBrush and add some rocks and cracks to detail them:


For the ruined stairs I looked at some other artist's zbrush sculpts as both reference and inspiration:


I worked backgrounds for this, constructing the highpoly first to get all the details in place:


I then retopologised the highpoly model to create the low-poly one:


I also made a squarer collider for the model, so the player can work on it more easily.

Once I was happy with all my models, I unwrapped them into one map and baked out some maps and textures.


Once the model was in dDo, I messed around with the different stone textures.


I settled on the painted and regular concrete, as they had a nice smoothness to them, but still looked crisp and rocky.

I also placed the models into unity, so I could see how they looked:


I was satisfied with the results of these models.


I think for a quick modular piece, they came out very well.

I think given more time, I would like to of had more variations to the archways, so that we could have less repetition in the scene, when it came to posing them.

Personally I also believe having these modular pieces earlier on, would of made for a better start to constructing our world, but that's just hindsight.