Tuesday 29 January 2013

3d Lesson 16 - Isometic Scene creation


As a follow up to the previous lesson on pixel art, I was looking at how to use 3ds Max to create an isometric scene.

 The task was very simple, after setting up a camera in an isometric view in 3ds Max, I improted in the Kenya scene image itno the background. Then all I had to do was to add my additional models into the scene, render them out - using transparency, then simply place them into the picture in Photoshop.

I found this to be a quick and easy way to create an isometric scene, and I enjoyed the task - though I would not really wish to develope this particular style of art any further, as it is a little too simplistic for my taste.

Monday 28 January 2013

Sketchbook 10 - Turian and Alien Design


The sketches I did for this week were with charcoal and pencil, I was attempting to practice shading and try to add more tone to my work as a whole.

I'm content with how they came out but not fantastic, I still find it a bit of a challenge to get shading accurately done with pencil and charcoal, but I'm pleased with the resulsts on the humanoid charracter, the turian looks distorted, but I worked on that piece without any line art.

2d Lesson 13 - Pixel Art


Our task for this week was to use pixels to create characters and objects and place them into a scene.


I made the characters and fire-hydrant, simply making various lines, and circles and sticking joining them together in photoshop until they eventually formed the character.

I found the whole method to be tedious - although eventually the process speeds up as you build up more assessts to re-use, I just find pixel art to require too much tedious work for such a simple image. I can understand the appeal of the style for its simplicity and character- but for me personally, it's not really something I'm fond of.

Sunday 27 January 2013

3d Lesson 15 - Maya Death Star Turret


This 3d lesson was an introduction to using Maya as opposed to 3ds Max. We were briefed with recreating a low-poly model of one of the gun turrets from Star Wars.


To begin with I created a box and simply used the extrusion tool to create the bottom stack of the turret. I found the program to be quite useful in terms of easily manipulating shapes, however I did have trouble navigating the interface as a whole.


I created a second box for the top of the turret, and used the extrusion tool to make two slots for the where the guns went, I also found the bevel tool useful when it came to making the edges smoother.


Finally I made the gun barrels out of cylinders and extruded and scaled the different lengths, all that was left was to line them up with the head of the turret and add a few last details.

I like Maya for the way you can easily manipulate and extrude existing faces, and for the quality of the render - however I really find the interface to be unintuitive at the moment - but I suppose that will change in time.

Wednesday 23 January 2013

Life Drawing 7 - Balance


This week's life drawing lesson was focused on capturing balance and pose within a model.


 We started off with a few warm up sketches - I put most of my focus on capturing the model's shape and former, I found this easy to do when I split him up into small segments before tracing around them to connect them back together.


I think I need to start pushing harder and shading more, in order to get my detail and to make the drawings start to stand out in a 3d sense, I am confident with drawing the figure and the body's form - but my shading needs alot of work otherwise I feel the drawings are let down.

Monday 21 January 2013

2d Lesson 12 - Insectoid Brief

Character Description:

An insectoid/human hybrid from a far off solar-system. Eons of evolution and DNA splicing has bred a distinctive species of mammals that have developed the extra appendages and wings of their bug-like ancestors. However due to the diluted human breeding over time the species had lost their ability to develop and grow their natural exoskeleton as well as many infants being born spineless. To compensate an exoskeleton is fused to the individual's body at birth, providing them the protection they need to survive the harsh, dry and irradiated terrain of their home world, whilst allowing them to move with their invertebrate skeleton.


Research and References:

Insect main features:
  • Six legs.
  • Segmented bodies.
  • Supported with a carapace exoskeleton made from chitin.
  • Usually have two wings, but can have four or even none.
  • Insects are invertebrates.
Honeypot Ants develop large abdomens that store honey, which they can then use for food and energy. The honey can be seen glowing in their abdomen.


The exoskeleton is generally divided into sub sections to allow movement of the different muscles. 


Chitin is acts like armour on an insect, protecting it's small frame.


Most insects possess exterior mandibles on their exo-skeleton, to aid them in digging or tearing up food.


Some insects such as spiders possess shiny, reflective black eyes - closer to a mammal.


Concept:

Initially I started off with some rough sketches - I set out with an idea of creating a humanoid/insect hybrid, but I wanted to avoid the cliches of an insect head on a human body. Instead I was hoping to try and find a way to morph a human into possessing distinctly insect features - whilst still holding onto human qualities - such as a face and humanoid figure.


 I settled on the idea of the third sketch as I felt it possessed the more humane side of a character, but you could still see the insect's origins from first glance. Still I wanted to use the carapace design and mandibles from the second and first sketches to flesh out the character's insect origins a bit more.


I added some additions of a honeypot power source, as used by ants - I thought this would be a decent way to give a sci-fi edge to the character, as well as it giving him a plausible explanation for insect based weaponry. I'm fairly happy with how the design came out - as a character I feel he could work well as a companion in a game, or perhaps an enemy in a shooter. If I had more time I think I would of attempted to work a more unique design onto his head - but as it stands I am fairly happy with the result.

Wednesday 16 January 2013

3d Lesson 14 - Frog Animation


In this last 3ds Max session, I had to rig the model of the frog I pelt mapped, using the default biped.

First I did was to flip the frog into an upright position, so that I could better line up the biped.


Once done I had to move the individual bones of the biped into the frog's corresponding limbs and body structure. It wasn't too difficult - the most tedious part was lining up the extra horse-link join in the leg. When the parts were lined up I used the skin modify to weigh the bones - I edited the envelope's vertices to make sure the model deformed properly according to the skeleton.


When I was satisfied with the weighting, all that was left, was to animate the skeleton using the key frames tool and make my animation.


I was very happy with how the rigging came out on this model - I felt the weighing was fairly accurate, and although there were some parts of the model that deformed a little incorrectly, this was due to the model itself rather than the weighing I think.


Tuesday 15 January 2013

2d Lesson 12 - Tonal Speed paint

 
Today we had to do two one hour speed paintings. The first was a black and white image of a small boy - I'm happy with how the design came out, but I definitely could of worked the tones to be more extreme.


I'm happy with how the image itself came out for this particular painting, but I definitely could of made the difference between the tones more obvious and contrasting, but I think the colour matching went well at least.

Sunday 13 January 2013

3d Lesson 13 - Pelting and Animation


Following on from the previous lesson we were looking at further adding the biped to a model of our own.


We were supplied with a model of a woman in a green - jacket and were tasked with retexturing her to her to a design of our own.


I decided to go for a survival/action hero look, with ripped jeans and bloody attire, I used textures of jackets and denim to create the outfit, then painted the stains over the top. I found the model very easy to texture - but no matter how much I edited the face, unfortunately it was still stuck with the same low detailed structure.


Once fully textured I had to insert the biped into the model, lining up the body parts to the biped like I did with the skeleton in the previous lesson. I found it easier to do than before, mainly due to teh fact the female model matched the biped's figure fairly well.


Once lined up, I added a skin modify to the model and used the biped's bones as the skeleton. I then had to edit the envelopes and vertices to control the strength of certain bones over the model's frame. I found it a very tedious task, and I did not finish it perfectly - however I understand how the process works now, and I find it simple to use - if just a one that requires alot of patience to fine tune the vertices.

I created a small animation to test the weighting on the model, and see what body parts tear and clip. I think it came out ok, there isn't any major deformation and the model remains somewhat in proportion, obviously I could of fine tuned it further, but I ran out of patience at the time - what with 3ds max glitching out half the time.


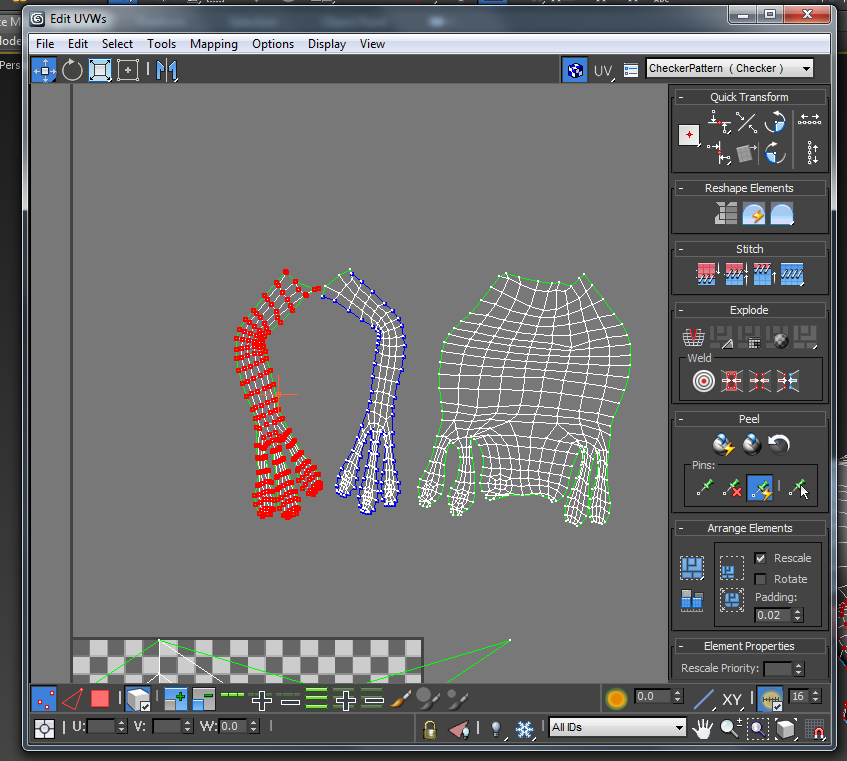
To round up the skinning side of the project, I was given a model of frog to unwrap it's uvs and texture.

 Following a tutorial I applied a UVW map to the model, and used the pelt tool to cut seams around the limbs and head.


Splitting the uvs apart like this means I could create a easy to read and well laid out uvw map, for me to texture It was simple enough to do, the tutorial explained it well, but it was a long process, but I can see the accuracy of the maps and how they reflect onto the model. Eventually I was left with a full map, constructed from the pelted model.


Using photoshop and a tablet, I painted the model's basic colour scheme before, adding frog texture, and a shiny overlay. The uv map wasn't perfect, but it didn't pinch too much and it was easy enough to texture with minimal stretching.


I'm quite happy with what I learnt using the pelt tool, I found laying out a uv map to orignally be a daunting task but after doing this exercise it's really quite simple, just will take further practice which I intend to use.


3d Lesson 12 - Biped Animation


This week I had to experiment with the Biped tool in 3ds max - which is used to create animations and rig/apply them to a character model. I found the tool to be very useful and I understand it will be crucial component to creating characters in a video game.


To begin with I generated the standard biped model and then messed with the proportions to better understand how the system worked. When I was done, I loaded up a supplied animation file and watched how it animated my biped.


 The next task was to edit some of the existing movement animation which I did, altering one of the current walk files animation using the layer tool - so I kept the same movement, but added alterations to it. In this case I did a sword and shield - it's very rough, but I found it a good way to start learning.


Another feature I tried out was the flex filter - which added a sort of jiggle based phsyic to an oject. I found this a fun to use to create a nose for the biped - but it would be better overall to use bones to animate.


Finally we tried animating a pre-made model using the biped in this case a skeleton.


In this case it was a task of lining up the biped skeleton with the skeleton model, then attatching each of the model's bones to the biped's. I had trouble with the fingers, but decided to leave them - as it would take too much work to break them apart. Overall I found this exercise a good introduction to animating and the biped tool, and I hope to expand my use of it and refine my animations and movements.